Saturday, 30 March 2013

Direct-X 10 full version.

DirectX 10


Microsoft DirectX enables games and multimedia applications on your system. DirectX is included as an important part of the any Windows operating system. To update your version of DirectX, you must update your Windows installation by applying the latest service pack and other updates via any Windows Update. Microsoft DirectX enables games and multimedia applications on your system. As Microsoft has announced that the DirectX 10 currently supports Windows XP, Windows Vista and Windows 7. 


Cody Brocious the alky head of the project has released a full preview of DirectX 10. Alky preview compatibility libraries for Microsoft DirectX 10 enabled Games. One of the best reason for gamer to change or upgrade the Operating System and video cards to play the largest games.
DirectX 10

Download

Here you also see 2 pictures sample to differences from DirectX 9 and DirectX 10 on images quality.

  Picture-1:
DirectX 9 Picture preview


Picture-2:
DirectX 10 Picture preview


Download link: http://199.91.153.89/4brs167igd0g/h10xfm6bxkdv4xy/directx_feb2010_redist.exe

Installation Instruction:

1.    At first download DirectX 10 from the download link and double click to open the file then click yes to continue. (Double click “directx_feb2010_redist” File ® Yes).
Step-1 Screenshot

2.   Now you will see extractor window, where you want to extracted files. (Click Browse Button®Choose your location®ok®ok).
Step-2 Screenshot

4.    Now you go to your extracted location or folder then Scroll down to find “DXSETUP.exe” file and run “DXSETUP.exe” file to install.
Step-3 Screenshot
 Now wait few minute up to finish your installation process.

 Enjoy……..@@@@@@@@

Tuesday, 26 March 2013

How to hack your Friend’s Facebook Account


Facebook


Some Computer Hackers have been busy in finding a ways to easily Hack Facebook Accounts. But hacking Facebook accounts is not an easy task because Facebook is paying supernal entirety to its security experts and penetration testers to keep user accounts as safe as possible. Facebook has integrated Three Trusted Friends feature to restore or recover lost passwords. This feature was included to recover or restore Facebook Account but it is exploited by hackers to penetrate into someone’s Facebook Account. Apart from third party tools it’s the only one possible way to hack Facebook Accounts. It’s the major loophole in Facebook security Keyloggers, Phishing websites are also the helpful alternate methods whereas brute forcing, dictionary attacks, DDOS attack etc. will not work directly due account lockout feature. Hacking of Facebook Account with Trusted Friends is also not so simple and easy. To get started with it, you have to create three fake Facebook accounts and make sure they are in friend list of the person whose Facebook account you are going to hack into this tricks.

It is only for knowledge and educational purposes don’t use it with wrong intention.


How to hack your Friend’s Facebook Account:


At first create three new Facebook Accounts and add these three accounts in your friend’s list. If you are done with the first step then you have also done 90% of your work.


Step-1:
Now click on Forgot your Password button, it’ll show three options to recover your password.
Account Identification Secreenshot

Step-2:
Then the first option gives his E-mail Address and gives your Friend’s Full Name in the name field. Now if everything goes well then you will see the profile picture of that person. Now click on the No longer have access to these.
Rest Password Screenshot

Step-3:
Now Enter Your New E-mail Address which does not associated with any Facebook Account yet. Now click on the submit button.
New Email Submitting Screenshot

Step-4:
Now you will be prompted to security question. If you know the answer then it is very well, otherwise gives wrong answers for three times.
Answer You Security Question Screenshot

Step-5:
After three unsuccessful attempts, it will ask you to recover your account with trusted fried feature. Now click on the Continue button.
Account Recovery 
Then it will ask you to choose three friends, now select your accounts from the list and click on Continue button each time. After sleeting three friends, Facebook will send security codes to the E-mail Address associated with those fake accounts. Now Login to each account and fill the security codes in the same manner. You can also check spam messages if the E-mail is not there.

Now you will get Reset password E-mail on your E-mail Address. That’s it, you have successfully hacked your friends Facebook Accountin 5th steps.

Enjoy……..@@@

Friday, 22 March 2013

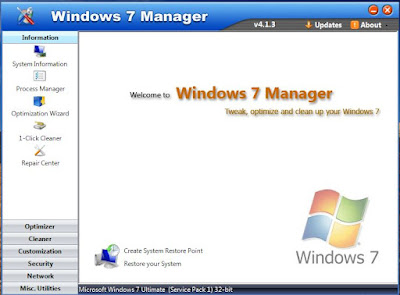
Windows 7 Manager v 4.1.3 full with Keygen

Windows 7 Manager v 4.1.3
Windows 7 OS offers dozens of configuration and customization settings, but sometimes the most interesting tweaks are best way too hidden for the average user.
Windows 7 Manager brings all those hidden tweaks and options to the spotlight, and presents they conveniently organized into seven different areas: Information, Optimizer, Cleaner, Customization, Security, Network and Miscellaneous Utilities.
Each of these areas in Windows 7 Manager include various tools with which you can clean the system from unwanted files, check what programs are scheduled to run with Windows, obtained highly detailed information about your hardware and customize menus and other visual elements to your knowledge. Don’t be afraid of trying all possibilities: Windows 7 Manager creates a system restoration point in case something goes horribly wrong.
Windows 7 Manager
                                                                       Download

Download link: http://205.196.123.177/b5owjo4v8big/ii33y7jkrxqgnbj/windows7manager.zip

Installation Instruction:

            1.   At first Download windows 7 manager v 4.1.3 and extract Win RAR file then install windows 7 manager on your hard drive or any other location where you want to extract files.
            2. Now open "keygen.exe" by right clicking and copy this serial key and paste it windows 7 manager register window.
            3. Now you have successfully register windows 7 manager.

   Enjoy.......@@@@@

How to Create an Invisible Folder without any Name

Nameless Folder

In this article we learn how to create an invisible folder without any name. At first create new folder or select any exists folder, now rename the folder and delete the folder name then hold “Altkey in the keyboard and press “0160 or 255”( Use Num Pad key into the right side keyboard) and release Alt key button into the keyboard. Now right click in your nameless folder and go to properties and then click “change icon”. Now select “blank icon” and apply then ok. 

It’s very easy to create, follow the steps below:

Step-1
At first create new folder or select any exists folder.

New folder or Exist folder screenshot.


Step-2
Now rename the folder and delete the folder name.

Rename the folder screenshot.

Step-3
Then hold “Altkey in the keyboard and press “0160 or 255”.

Keyboard 

Step-4
Now right click ®in your nameless folder and go to ®properties and then click ®“change icon” ®select “blank icon” and® apply ® OK.
.
Icon change screenshot

Step-5
Showing the Nameless Folder.
Nameless Folder
You have successfully done to create an invisible and nameless folder, which is invisible to others people. Hope you enjoy this tricks........@@@@@@

Thursday, 21 March 2013

How We Can Create Our Own Calculator Using Without any Software


Batch files are text files that contain a sequence of commands commonly used in system command prompt to perform various computer operations like starting programs or running system utilities, etc. In Disk Operating System (DOS) and Windows, batch files are intended to be executed by the command explainer. There are many computer operations that can be performed by using these .bat files. In this article we will know how we can create our own calculator by writing a few commands.

Open notepad file or any other text editor then Copy & Paste the following code into the notepad:

@ECHO OFF
color a
title My Calculator
pause
ECHO ---------------------------------------- -------
ECHO * = MULTIPLY
ECHO + = ADD
ECHO - = SUBTRACT
ECHO / =DIVIDE
ECHO ---------------------------------------- -------
pause

:loop
echo.
echo ---------------------------------------- -------
SET /p UDefine=
SET /a UDefine=%UDefine%
ECHO =
ECHO %UDefine%
ECHO.
goto loop
 
Then save it as “calc.bat” where “.bat” is extension for batch files. Now go to your save location and double click on the batch file icon (Clac), now open your own Calculator in command prompt window.
Calculator in command prompt

You can also convert “.bat” to “.exe” by using “.bat to .exe converter software”. Please follow the link below to download this software. 

http://www.f2ko.de/downloads/Bat_To_Exe_Converter.zip

Enjoy........@@@

Tuesday, 19 March 2013

Increase Your browsing speed of Opera Mini & Mod Version:

Follow the following steps:
1. Download the appropriate version of "Opera Mini" or "Opera Mod" ( Not Opera Mobile ) by clicking these links :

Opera Mini
2. Install the application and Allow the necessary settings & Accept the EULA ( End-User-License-Agreement )
3. In the Browser's "Write Address" section , write
about:config
4. You will then find a page !! There you will find a Menu like this

*Large placeholders for images. (Default:Yes) make it No
*Fit text to screen (Default:Yes)
*Loading Timeout (default:30) make it 20 [Before Uploading photo make it 3600]
*Site patches and user-agent masking (default Yes) make it No
*Keep styling in RSS feeds (default:No)
*Showfeedindex (default:Yes) make it No
*Fold linklists (default:Yes) make it No
*Phonenumber detection (default: Yes)
*Minimum phone number length (Default:7) make it 9
*Use bitmap fonts for complex scripts (Default=No) (if u make it yes then u can see bangla but u cant get proper high speed of operamini if u want to make it yes then plz download opera MOD version so u can see bangla with high speed browsing)

Thats all now restart your Opera mini/Mod & browse high speed internet
Just follow our above instructions & see what happen.
THANKS .


Saturday, 16 March 2013

How Can You Create a New Recycle Bin Similar to the Normal Recycle Bin…?


You can create a new Recycle Bin easily which is work to the normal Recycle Bin. Please follow this step by step guide that will show you how to create a new Recycle Bin which is similar to normal Recycle Bin.

·   Step-1
Create a new folder in C Drive of the computer.
C Drive 1

·  Step-2
 Then rename it “Recycle Bin2” or whatever you want to wish.
C Drive 2

· Step-3
Then right click in the folder® Send to® Desktop (create shortcuts)
C Drive 3
·  Step-4
 Now go to desktop and select the folder which was send to desktop and rename it “Recycle  Bin2” or whatever you want to.
Renaming "Recycle Bin2" into desktop Screenshot
· Step-5
Then right click into the folder and go to® properties ®Customize ® Change Icon ® Select icon ®Click OK ®Apply ® OK.
Changing Icon into desktop Screenshot
· Step-6

Now you would like to Hide the original “Recycle Bin2” folder from the C Drive and make it only accessible from the desktop similar to the default Recycle Bin. Please open the command prompt and type the following code in the command prompt given below:
1.       Attrib “C:/Recycle Bin2” +r +s +h (Press Enter) ¿
2.       Then Type exit(Press Enter) ¿
Command prompt

Now the folder is Hidden from C Drive.


· Step-7
We will need to create two batch files for move any file into Recycle Bin2 and empty any file into Recycle Bin2. Go to desktop ® open Notepad file ® Copy & Paste the following code:
                   @echo off
                     cls
                     echo moving file(s) to RB3...
                      move %1 "C:/RB3/"

              Now save it as RB2bin.bat and move into the “C:\WINDOWS\system32” folder. “RB2bin.bat” file  create for moving any sleeted file into the Recycle Bin2 folder.

               Then create another batch file for Emptying the Recycle Bin2. Open Notepad file ® Cope & Paste the following code into the notepad bellow:

             @echo off
               cls
               echo Emptying RB3..
               attrib "C:/RB3" -r -s -h
               rd /s /q "C:/RB3"
               md "C:/RB3"
               attrib "C:/RB3" +r +s +h

Then save it as RB2del.bat and move into the “C:\WINDOWS\system32” folder. “RB2del.bat” creates for Emptying Recycle Bin2.

· Step-8
Now create to Registry entry for these files, open “Registry Editor” by going to Start + R ® Run, then type regedit and press Enter¿

· Step-9
Now you will see in the left column of Registry Editor, Right click the “HKEY_CLASSES_ROOT” ® Expand, You’ll must see “ * “ (type of folder) on the top . Then right click “* (type of folder)” ® Expand, you’ll see “shell” otherwise Right click on * (type of folder) ® New ® Key and name it “Shell”.

· Step-10
Then Right click on the “shell” and create another Key with name “Empty the Recycle Bin2 “(Right Click “shell” ® New ® Key ® Empty the Recycle Bin2). Now Right click Empty the Recycle Bin2 and create another Key with name – command (Right click Empty Recycle Bin2® New®Key®command). Now click on the command and select the file shown in right side of the editor with name Default. Right click on it and select modify (Right click ® Modify). Type the following path in “value data field”:
“C:\WINDOWS\system32\r2del.bat"
And Click ok.

· Step-11
Similarly right click on the Shell and create another key with the name Move to Recycle Bin2 (Right click “shell”® New®Key®Move to Recycle Bin2). Now create another key in it with the name – command (Right click “Move to Recycle Bin2”® New®Key®command). Then click on the command and select the file in the right side of the editor with the name Default. Modify the file by typing the following value in the “value data field”:
 “C:\WINDOWS\system32\r2bin.bat" "%1"
And Click Ok.

· Step-12
Now quite below the * (type of folder or subdirectory) and also find the subdirectory of HKEY_CLASSES_ROOT named directory in the Registry Editor. Then Expand the directoryby clicking right mouse button (Right click directory®Expand).

Then you should be seeing a folder name shell. Repeat the exactly same process Right click on the “shell” and create another Key with name “Empty the Recycle Bin2 “(Right Click “shell” ® New ® Key ® Empty the Recycle Bin2). Now Right click Empty the Recycle Bin2 and create another Key with name – command (Right click Empty Recycle Bin2® New®Key®command). Now click on the command and select the file shown in right side of the editor with name Default. Right click on it and select modify (Right click ® Modify). Type the following path in “value data field”:
“C:\WINDOWS\system32\r2del.bat" And Click ok. 
Similarly right click on the Shell and create another key with the name Move to Recycle Bin2 (Right click “shell”® New®Key®Move to Recycle Bin2). Now create another key in it with the name – command (Right click “Move to Recycle Bin2”® New®Key®command). Then click on the command and select the file in the right side of the editor with the name Default. Modify the file by typing the following value in the “value data field”:
 “C:\WINDOWS\system32\r2bin.bat" "%1" And Click Ok.
 done in the above in the * subdirectory by creating two keys named Empty the Recycle Bin2 and Move to Recycle Bin2 and so on..

Now Recycle Bin2 will work as the normal recycle bin. You can check it by clicking the right button on a file and selecting “Move to Recycle Bin2” option.

Enjoy ……..@@@